Service Manager
Setting Up Incident Management
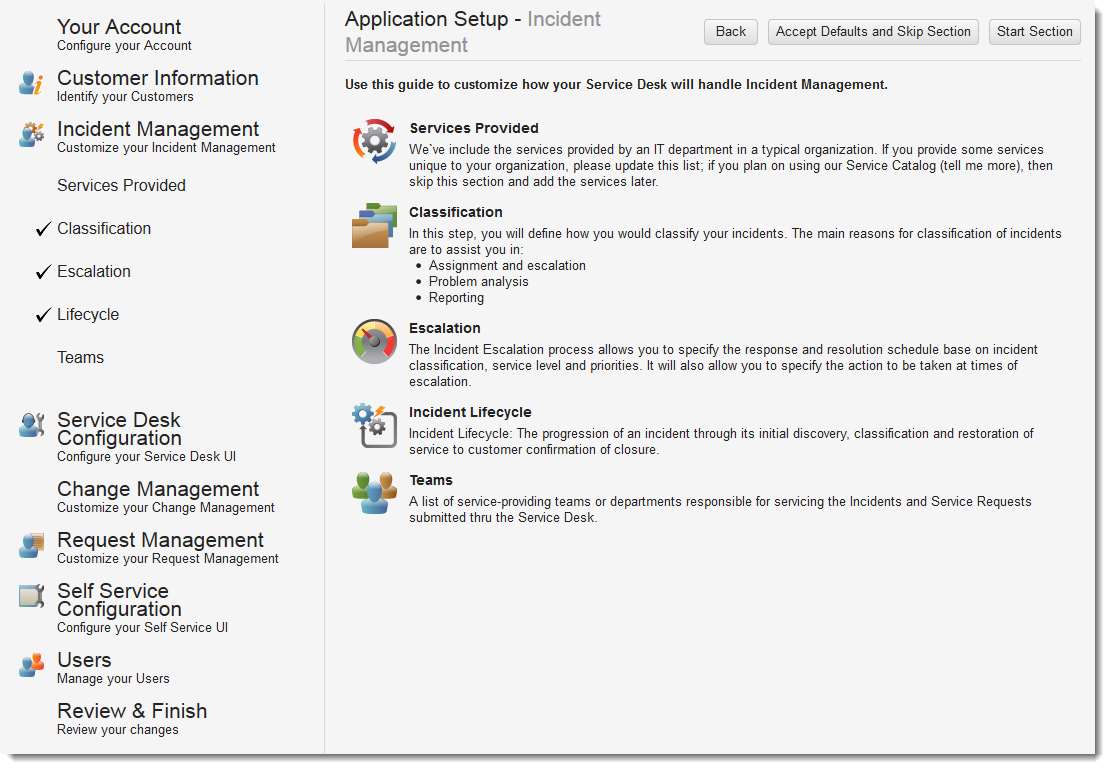
Use the Application Setup - Incident Management page to define how your Service Desk will manage incidents.
Application Setup - Incident Management Page
This is one step of the application setup process. For more information about this process, including how to access this page, see Setting Up the Application.
See the following sections:
•Defining the Services Provided
•Defining Incident Categories for Each Service
•Defining Escalation Parameters
•Defining the Steps for the Incident Lifecycle
•Identifying Teams That Your Organization Supports
Defining the Services Provided
On this page, you define the services that your organization supports.
1.Click Services Provided. The application displays the Application Setup - Services Provided page.
2.To add a new service, do the following:
| a. | Click Add Service. |
| b. | Enter the name and a description of the service. |
| c. | Click Save & Activate. The application adds the service to the list and makes it active. By default, each service is active and available for customization. |
3.Click Edit next to the service name to edit its name or description.
4.Click Next to go to the next page.
Defining Incident Categories for Each Service
On this page, you define the incident categories for each service. Classifying incidents aids you in assignment, escalation, problem analysis, and reporting.
|
Service |
Categories |
|
Application Development Service |
Application development services, such as: Application security Connectivity Error messages Functionality How to Performance |
|
Benefits Management |
Benefits management services, such as: Application security Benefits management Connectivity Functionality How to Missing item |
|
Communications Services |
Services related to audio and video communications, such as: Account lockout Connectivity Error messages Functionality How to Performance Telephone failure Voicemail issues |
|
CRM Service |
CRM (Customer Relationship Management) application services, such as: Account lockout Application security Connectivity Data corruption Data loss Functionality How to Performance |
|
Data Service |
Data services, such as: Accident report Backup Capacity Connectivity Data corruption Data loss Error message Functionality How to Performance |
| Demo Service |
Demo category |
|
Desktop Service |
Provides services that manage the hardware and software at the desktop level. Account lockout Application error Application failure Application security Boot failure Cable failure Capacity Computer provisioning Connection failure Connectivity Data loss Desktop hardware Desktop software Device failure Error messages Functionality Hard drive failure How to Incorrect address book Internet failure Network folder failure No dial tone Out of disk space Performance Performance issue Printer failure Software failure Software installation Software request Telephone failure Virus/Trojan Warning |
|
Email Service |
Email services, such as: Account lockout Application security Capacity Client failure Connectivity Corrupt mailbox Delivery failure Error message Functionality How to Missing item Performance Warning |
|
Employee Administration |
Administrative functions of employee management, such as: Account lockout Application security Capacity Connectivity Data loss Functionality How to Incorrect address book Misconduct Performance Warning |
|
Employee Development |
Employee development issues, such as: Account lockout Application security Capacity Connectivity Data loss Functionality How to Lost training material Missing item Training complaint |
|
Enterprise Application Service |
Provides support for enterprise-wide applications, such as: Accident report Account lockout Application security Capacity Connectivity Data loss Enterprise application service Error message How to Performance Warning |
|
Facilities Management |
Facilities management tasks, such as: Accident report Account lockout Application security Capacity Connectivity Data loss Delivery failure Facility maintenance Facility safety Facility security Functionality How to Missing item Power failure Temperature |
|
Financial Service |
Financial services, such as: Account lockout Application security Capacity Connectivity Data loss Error message Functionality How to Missing item Performance Warning |
|
HR System |
Human resources application, such as: Account lockout Application security Capacity Connectivity Data loss Error message Functionality How to Performance |
| IT General Administration |
IT general administration services |
|
Mail Service |
Mail services, such as: Account lockout Application security Capacity Connectivity Data loss Delivery failure Functionality How to Missing item Non delivery |
|
Mobile Communication |
Mobile communication issues, such as: Accident report Account lockout Capacity Connection failure Connectivity Device failure Functionality How to International dialing failure Lost or stolen phone Performance Voicemail issue |
|
Network Service |
Provides services for network-related requests, such as: Account lockout Capacity Connectivity Error message How to Network folder failure Performance |
|
Payroll Administration |
Payroll administration services, such as: Account lockout Application security Capacity Connectivity Data loss Functionality How to Misconduct Missing item Performance Wrong bonus Wrong pay Wrong tax code |
|
Printing Service |
Printing services, such as: Accident report Account lockout Application security Capacity Connectivity Error message How to Missing item Performance Printer failure |
| QA |
QA services, such as: Performance |
|
Server Administration |
Provides support for servers, including maintenance, backups, and installations: Account lockout Application security Boot failure Capacity Connectivity Data loss Device failure Error message Functionality How to Performance Virus/Trojan Warning |
|
Service Desk |
Services used to record requests not related to a specific service in the Service Catalog, such as: Capacity Connectivity How to Misconduct Service desk |
|
Supply Chain |
Supply chain services such as: Account lockout Capacity Connectivity Data loss Functionality How to Misconduct Missing item |
|
Travel Management |
Travel management services, such as: Accident report Account lockout Application security Connectivity Functionality How to Misconduct Missing item Performance |
|
Web Hosting Service |
Web hosting services, such as: Account lockout Application security Capacity Connectivity Data loss Error message Functionality How to Missing item Web site failure |
1.Click Classification.
2.Select a service to view all the categories that are associated with it.
3.To add a category, do the following:
| a. | Click Add category. |
| b. | Enter a name. |
| c. | Click Save & Activate. The application adds the category to the list and makes it active. By default, each category is active and available for customization. |
4.To deactivate a category, click Deactivate next to the category name. Click Activate to activate it again.
5.To modify a category name, do the following:
| a. | Click Rename next to the category name. |
| b. | Enter a new name for the category. |
| c. | Click Save. |
6.Click Next to go to the next page.
Defining Escalation Parameters
Use the Application Setup - Incident Escalation page to define how your service desk prioritizes and responds to incidents in the escalation engine. This includes the total resolution time in an escalation lifecycle upon its creation, and the length and dependencies of each escalation stage. Specify the response, type of response, and resolution schedule based on the classification, service level, and priority of the incident.
Factors affecting escalation schedules can include hours of operation and service level agreements. Throughout the incident management process, the application notifies users when there is a change in the status of the incident and when the incident is resolved.
By default, the page displays priority categories 1 to 5, each with its default time limits for responding to an incident once logged, as well as a default interval for resolving the incident.
1.Click Escalation. The application displays the Application Setup - Incident Escalation page.
2.Click Edit next to a priority level to customize the settings.
3.Check Target resolution time to enable this portion of the escalation schedule. Here, you define a target resolution time for the incident. This can be dictated by a service level agreement.
| a. | Enter a number in the field. |
| b. | Select an interval from the drop-down list (minutes, hours, or days). |
4.Select the hours of operation for your organization.
5.Set the levels of escalation associated with the target resolution cycle.
| a. | Check After for each escalation level to enable. You can define up to three escalation levels. |
| b. | For each escalation level, move the slider left or right to select an amount of time. |
| c. | For each escalation level, from the drop-down list, select an action to take when the time limit has expired on the escalation. |
If you select an escalation notification from the drop-down lists, then the first escalation level must be less than or equal to the second escalation level, and the second escalation level must be less than or equal to the third escalation level.
For example, a priority 1 incident is set to resolve in 1 day. The first escalation is set to occur after 5 hours and 2 minutes (21% of 24 hours) from the incident creation time. The second escalation is set to occur after 7 hours and 12 minutes (30% of 24 hours) from the incident creation time. The third escalation is set to occur after 19 hours and 55 minutes (83% of 24 hours) from the incident creation time.
You cannot set the first escalation to occur after 7 hours and 12 minutes (30% of 24 hours) from the incident creation time if the second escalation is set to occur after 5 hours and 2 minutes (21% of 24 hours) from the incident creation time, because the first escalation time is after the second escalation time, which is not logical!
| d. | From the After the target time has reached drop-down list, select a quick action to take when the time expires on the resolution cycle. |
The application notifies the Service Desk Manager when the resolution time is breached.
You can select from this list of quick actions:
|
Quick Action |
Definition |
|
none |
No action taken. |
|
"Waiting for Customer" |
Adds an incident with a status of waiting for customer to the record. |
|
1st Escalation Notification |
Sends a first escalation notification message to associated parties. |
|
2nd Escalation Notification |
Sends a second escalation notification message to associated parties. |
|
3rd Escalation Notification |
Sends a third escalation notification message to associated parties. |
|
Account Lockout |
Adds this incident classification to the record. |
|
Account Lockout - Domain |
Adds this incident classification to the record. |
|
Account Lockout - HR System |
Adds this incident classification to the record. |
|
Add Attachment |
Adds this instruction to the record. |
|
Add Change |
Adds this instruction to the record. |
| Add CI Computer | |
| Add CI Printer | |
|
Add Internal Task |
Adds this instruction to the record. |
|
Add Inventory Item - Computer |
Adds this instruction to the record. |
|
Add Inventory Item - Mobile |
Adds this instruction to the record. |
|
Add Inventory Item - Network Device |
Adds this instruction to the record. |
|
Add Inventory Item -Printer |
Adds this instruction to the record. |
|
Add Inventory Item - Undefined Type |
Adds this instruction to the record. |
|
Add Notes |
Adds this instruction to the record. |
|
Add Problem |
Adds this instruction to the record. |
| Assign Incident to Me | |
|
Auto Close |
Automatically closes an incident with a status of resolved after a specified number of days. |
|
Auto Close "Waiting for Customer" |
Automatically closes an incident with a status of waiting for customer after a specified number of days. |
| Backout Resolution | |
|
Backup Failure |
Adds this incident classification to the record. |
| Calculate Cost | |
|
Called Customer |
Adds a called customer entry to the record. |
|
Cannot Access Shared Drive |
Adds this incident classification to the record. |
| Cannot open Outlook | |
| Clear Master Incident Link | |
| Clone Incident | Clones the incident. |
| Close from Self Service | |
|
Close Incident |
Closes the incident. |
| Copy from Master to Related Incidents | |
| Copy Master Detail | |
| Copy Resolution from Master to Related Incident | |
| Create Assignment | |
|
Create Memo |
Creates a memo for this exception. |
| Declare Master Incident | |
| Demote Master Incident | |
|
Desktop Application Failure |
Adds this incident classification to the record. |
|
Email access on mobile device |
Adds this incident classification to the record. |
|
Email - Cannot Open Outlook |
Adds this incident classification to the record. |
|
Email Customer |
Emails the associated customer. |
|
Export |
Exports record data to another file or file format. |
|
Incident Assigned Notification |
Sends a notification message of an incident status change to assigned to associated parties. |
|
Incident Closure Notification |
Sends a notification message of an incident status change to closed to associated parties. |
|
Incident Priority 1 Notification |
Sends a notification message of an incident change to a priority 1 classification to associated parties. |
| IncidentResolved | |
|
Incident Resolved Notification |
Sends a notification message of an incident status change to resolved to associated parties. |
|
Incident Update Notification |
Sends a notification message of an incident status change to update to associated parties. |
|
Left Voice Mail |
Adds a left voicemail entry to the record. |
|
Mobile Phone - Email Issue |
Adds this incident classification to the record. |
|
Move Resolution to Active History |
Moves the resolution to the activity history. |
| New Document Article | Creates a new document for the Knowledge Base. |
|
New Error Message Article |
Creates a new error message article for the Knowledge Base. |
|
New FAQ Article |
Creates a new FAQ entry for the Knowledge Base. |
| New Incident Notification | |
|
New Issue Resolution Article |
Creates a new issue resolution article for the Knowledge Base. |
| New Patch Article | |
| New Q & A Article | |
| New Reference Article | |
|
NewIncidentNotification |
Sends a notification message to associated parties when a new incident is created. |
| New TaskAssignment | |
|
No dial-tone on my phone |
Adds this incident classification to the record. |
|
PC is very slow |
Adds this incident classification to the record. |
| Post Social message associate with Incident | |
| Print Incident | Prints the incident. |
|
Printer Out of Toner |
Adds this incident classification to the record. |
|
Printer Paper Jam |
Adds this incident classification to the record. |
|
Problem Workaround Notification for Incident Owner |
Sends a notification message of a problem workaround being recorded for an incident to associated parties. |
|
Reassign Owner Team |
Reassigns the incident to a new owner team. |
|
Resolution Threshold Breach |
Sends a notification message of a resolution threshold breach. |
|
Resolve Incident |
Changes the incident status to resolved. |
|
Resolve Incident Related to Problem |
Changes the incident status to resolved and updates the problem record accordingly. |
| Resolve Incident via Problem Resolution | |
| Resolve Incident via Problem Workaround | |
|
Response Threshold Breach |
Sends a notification message of a response threshold breach. |
|
Save |
Saves the incident record. |
| Set DSMTaskExisted | |
|
Software Failure |
Adds this incident classification to the record. |
|
Software Request |
Adds this incident classification to the record. |
| Start Remote Control | |
|
StopClock |
Stops the escalation clock. |
| Update Related Incident | |
| Update Related Incident Resolution | |
|
Update Status to Active |
Changes the incident status to active. |
| View Workflow | |
|
Voicemail Problem |
Adds this incident classification to the record. |
|
VPN Connection Failure |
Adds this incident classification to the record. |
6.Check Target response time to enable this portion of the escalation schedule. Here, you define a target time to respond to the incident once it has been recorded. This can be dictated by a service level agreement.
| a. | Enter a number in the field. |
| b. | Select an interval from the drop-down list (minutes, hours, or days). |
7.Select the hours of operation for your organization.
8.Set the levels of escalation associated with the response cycle. See step 5 for details.
9.Click Save to go to the next page.
10.Repeat steps 2 through 9 for all of the priority levels.
11.Click Next to go to the next page.
Defining the Steps for the Incident Lifecycle
On the Application Setup - Incident Lifecycle page, you select the actions to take at each stage of your incident management cycle. If you have advanced lifecycle requirements, you can define them later. The default incident lifecycle settings are:
•Incident logged
•Waiting for vendors
•Active
•Waiting for customer
•Resolved
•Closed
Follow these steps:
1.Click Lifecycle.
2.For each incident lifecycle stage, check the quick actions to occur.
3.To automatically send an email when the application updates the incident to the associated status, do the following:
| a. | Check Send Email. |
| b. | Use the associated drop-down list to select a notification type, such as Incident Closure Notification when the incident is in the closed status. |
| c. | Click Preview Email to preview the message. |
4.To add another quick action to this lifecycle stage, do the following:
| a. | Click Add another action. |
| b. | Select a quick action type. You can select from the following quick actions: Composite, Insert Child Object, Send Email, and Update Object. |
| c. | Select a quick action. The application lists the quick actions that are associated with the selected quick action type. |
| d. | Click Save. |
5.Click Next to go to the next page.
Identifying Teams That Your Organization Supports
Use the Application Setup - Teams page to identify the teams that your organization will use to support its service desk. Teams that support your organization (that is, that the application lists with a Service Desk: Yes entry) can be either active or inactive.
There are three types of teams:
•Supported and active
•Supported and inactive
•Not supported
Follow these steps:
1.Click Teams.
2.To activate a supported team that is currently not active, click Activate next to its name.
3.To deactivate a supported team that is currently active, click Deactivate next to its name.
4.To remove a team from the list of supported teams, do the following:
| a. | Click Edit next to its name. |
| b. | Uncheck Service Desk. |
| c. | Click Save. The application changes the entry to Service Desk: No. |
5.To add a new team to support the service desk, do the following:
| a. | Click Add Team. |
| b. | Enter a unique name for the team in the Title field. |
| c. | Enter the email address for the team in the Email field. You can create a unique email account for each team. |
| d. | Check Service Desk to include this team in the Service Desk support for first line incident response and resolution. |
| e. | Click Save. |
6.Click Next to save your settings and go to the next page. See Configuring the Service Desk.
Was this article useful?
Copyright © 2019, Ivanti. All rights reserved.